IRC Bouncer
Web configuration
The IRC bouncer can easily be configured over the web interface: https://shell.lug.mtu.edu:50000/
Starting up
Use your browser to connect to https://shell.lug.mtu.edu:50000/ and log in with your shell.lug.mtu.edu username and password.
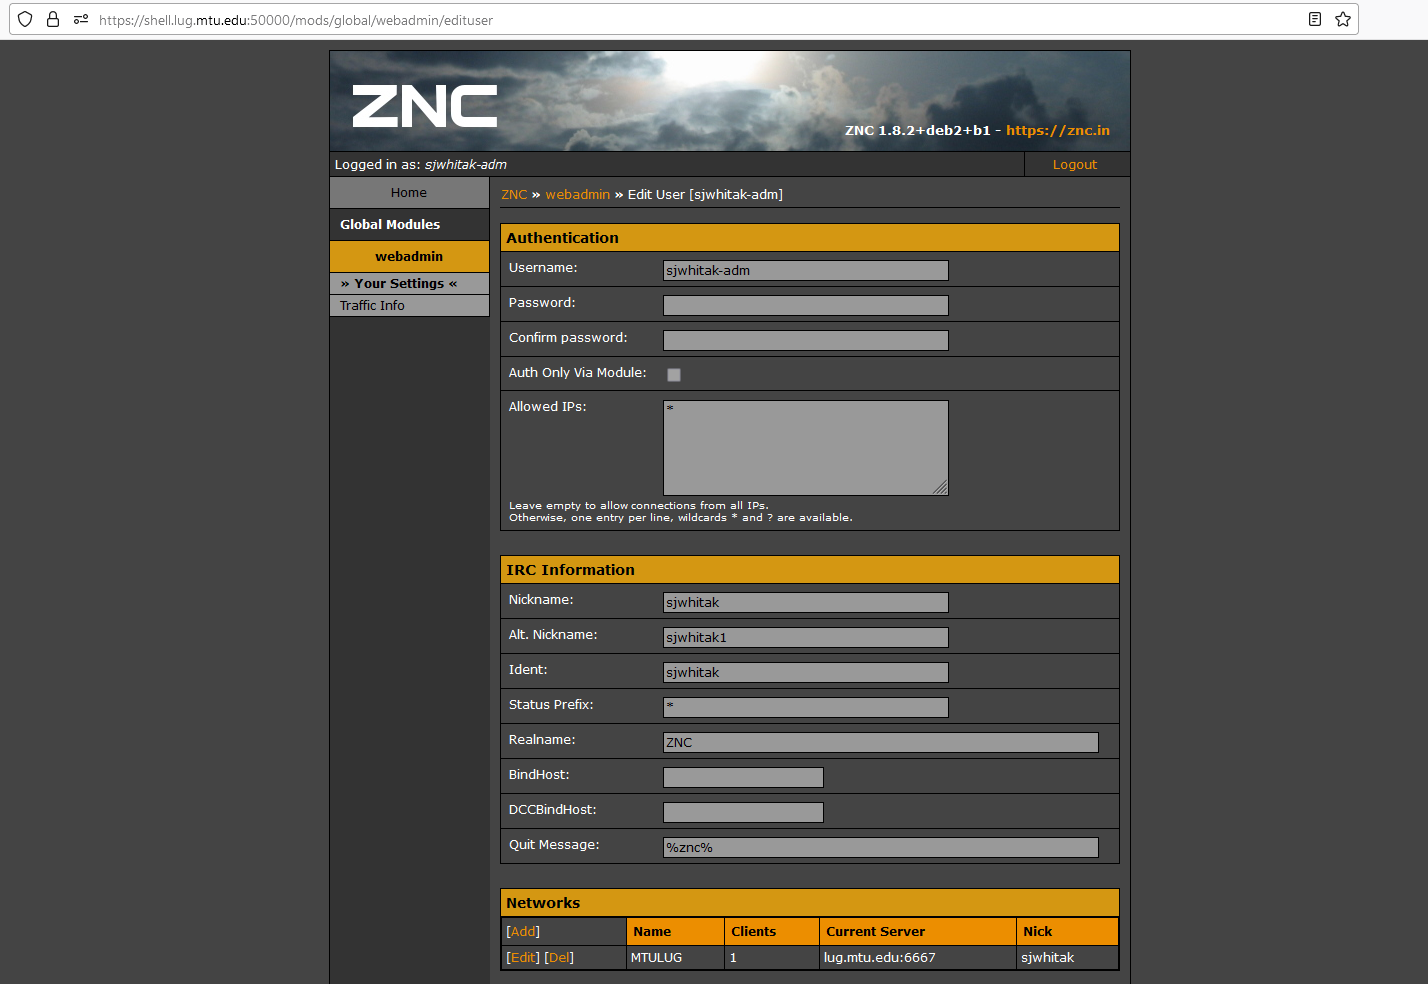
Click on "Your Settings" to adjust your parameters. You'll default to log in to lug.mtu.edu IRC, but you may want to change your username or add a different server.
Authentication
Don't change the username+password sections. It won't change anything. This ZNC bouncer is set up using PAM to authenticate through your Linux username and password. I don't actually know what'll happen if you change it.
IRC Information
Nickname is the username that will be on IRC. This is not what you log in to, but this is what others will see.
The other IRC information is not really useful. Just choose an alternative nickname in case someone is trying to impersonate you: register your account to prevent this.
Networks
You will default with lug.mtu.edu as a connected IRC with the username changeyourname.
You can add more networks if you want, but I'd be wary since MTULUG is running this bouncer, so they can see all your logs.
Modules
You can click on each module to read what each of them do, but I recommend making sure the log module is enabled (else there's really no point to the bouncer).
If you want personal logging, you'll need to a command on the shell server. Inside the server, type:
user $sudo setup-znc-loggingThis will make a directory, ~/irslogs and all your new logs will be added there. You must keep write access to the _znc group so ZNC can write to the logs.
IRC connection
I'm going to explain this using HexChat since it's the simplest. If you want to use irssi or WeChat, you probably already know what's up, or how to look things up.
Honestly, mostly just follow ZNC's HexChat setup, but this is specifically for lug.mtu.edu if there's something off.
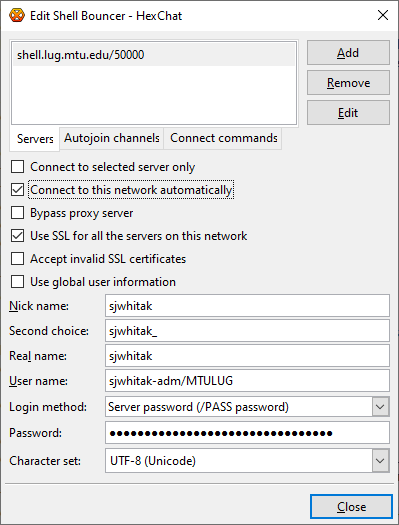
- Open up Network List,
Ctrl+S. - Click Add (adding a new network, the ZNC bouncer)
- Set name to whatever you want, I use
MTULUG Bouncer. - Edit this network:
- Servers value should be:
shell.lug.mtu.edu/50000 - Check the
Connect to this network automatically(if you want to connect to this network automatically...). - Check the
Use SSL for all the servers on this network. - Do not accept invalid SSL certificates and do not use global user information.
Nicknamehere is what you set as the nickname on the ZNC web interface.Second choicehere is what you set as the alternative nickname on the ZNC web interface.Usernameis your shell username + /MTULUG or whatever Network Name on the ZNC web interface you chose.- Example:
sjwhitak-adm/MTULUGwill auto-log in to theMTULUGserver on the ZNC bouncer. - Example:
sjwhitak-adm/LiberaChatwill auto-log in to theLiberaChatserver on the ZNC bouncer.
- Example:
Login methodset toServer password (/PASS password)Passwordhere you type in your shell.lug.mtu.edu password.
- Servers value should be:
- Set name to whatever you want, I use
- Close the configuration, then highlight this network and click
Connect.
Suppose you have multiple networks, you'll need multiple connections to the ZNC. So, set this all up again but the Username parameter should have the <username>/MTULUG value changed to <username>/<server> where <server> is the name that you chose in the ZNC Networks list.

